Last Updated: October 1, 2024


GL Code Setup
Prior to exporting invoices to Xero, you may wish to set the default GL Code. This enables a streamlined export process wherein the nominated GL Code is selected and applied when transferring your approved invoices to Xero. A few main methods for applying these defaults exist; by Outlet, by Supplier, and by Item.
Tip: If your database consists of multiple Outlets, and your GL Code is blank at lower Outlets, then details will be automatically retrieved from the Corporate Outlet. This enables the below GL Code methods to apply default values from your Corporate-Level Outlet unless otherwise specified.
If don't want an Outlet to automatically retrieve GL Codes from the Corporate Outlet then you can enable the Exclusively use Outlet Specific GL Codes Admin Setting at that Outlet.
Default GL Code By Outlet
This option gives you the flexibility to establish a default GL Code in your Configuration for all items in your Outlet, while also having the option to later assign a different GL Code for Suppliers or items with unique requirements.
Configuration GL Codes are used only when GL Codes in other locations are blank. Meaning, if your Outlet or the Corporate Outlet has GL Codes for the Supplier or Stock Item, those will take priority.
To apply a default GL Code across all of the Outlets Suppliers and items, navigate to the Integration page and select Xero.

Next, click the Configuration button.

On the Configuration window you can enter your preferred accounts for food items, rounding, non-food items, and freight.
-png-1.png?width=498&height=658&name=image%20(1)-png-1.png)
These default accounts will be applied to all items in your Outlet, except for those with an Individual GL Code or if you have set up specific Supplier GL Codes.
Exclusively use Outlet Specific GL Codes
If you have Outlets in your Database that use their own accounting platform and have a separate set of GL Codes then you can enable the Exclusively use Outlet Specific GL Codes setting at the relevant Outlets.
This option is ideal for franchises or subsidiaries that require individualised accounting practices.

When this setting is activated, only the GL Codes specific to this Outlet will be used in your invoice transfers.
In cases where the GL Code fields are blank, the system will no longer pull any GL Codes from your Corporate Outlet.
Default GL Code By Supplier
To apply a default GL Code across all of a Supplier's stock items, navigate to your Address Book under the Admin page:

Select your desired Supplier from the list provided and open the Supplier Settings tab:

Click image to enlargeEnter your desired GL Code under the Default Account Code field and click Save. If required, repeat this process for any other Suppliers you wish to update.
Please Note: This default GL Code will only apply to stock items which are Food/Beverage/Default enabled. Stock items which do not fall within this category must be directed to a specific GL Code manually when exporting an invoice which contains them. Alternatively, please see GL Codes By Item below to specify individual GL Codes to bypass this requirement.
GL Codes By Item
When you assign a GL Code to an item in Stock Maintenance, this specific GL Code will always be used for that item - no matter your other settings.
From the navigation bar, expand the Stock heading and open the Stock Maintenance page:

Under the Stock By Suppliers tab, use the drop-down to select the desired Supplier you wish to add GL Codes for. Now enter the relevant GL Code into the GL Account field and Save when done:

Now these Brioche Buns will always transfer to Xero with a GL Code of '310' for invoices at this venue.
Connecting to Xero
To allow the transfer of invoices and other functionality, begin by connecting to Xero. This connection can be established by attempting any function on the Xero Integration page, such as by clicking Transfer Invoice, Set Tracking Category, or Check Exporting Status.
Once you have selected an applicable function, you will be prompted to connect. Click the Connect to Xero button, and the Xero login page will then be displayed:

Log in to your Xero account using your Xero credentials and select the desired Xero organisation. Provide the platform with access to your Xero organisation when prompted.
The Xero login page will then be closed automatically and a notification advising the connection was successful will be displayed. Click Continue to proceed and the intended function you had selected earlier will then be performed.
Xero Settings
Set Tracking Category
Returns a list of your available Tracking Categories from the selected Xero organisation for automatic association. You may select one Category Option under a maximum of two Tracking Categories from the list provided and click Select to apply your preference:
![]()
Any exported invoices thereafter will be automatically assigned the noted Tracking Categories.
Mark as Exported
This marks the selected invoices as Exported to the selected Xero organisation. Use this feature to allow the system to recognise that an invoice has been exported to your accounting package without actually exporting it. This function is often used when an invoice has already been entered into your accounting package and was not sent via our platform.
Check Exporting Status
Searches the selected invoices in the connected Xero organisation to determine whether they have been exported. Once checked, the Exported field will display information regarding whether the selected invoices already exist within Xero. The name of the corresponding Xero Supplier will be shown in brackets, if available:

Show Exported Invoices
Returns a full list of all invoices that have been exported (or marked as exported) to Xero. Click this button again to hide all exported invoices.
Set Invoice Status Code
Setting the Invoice Status Code will allow you to transfer invoices directly to the selected status in Xero:

Begin by clicking the Configuration button:
Under the Invoice Status Code dropdown, you can choose your desired default status:

Selecting DRAFT will allow you to transfer invoices directly to the ![]() status in Xero. Choosing SUBMITTED will move them to the
status in Xero. Choosing SUBMITTED will move them to the ![]() status, while selecting AUTHORISED will place them in the
status, while selecting AUTHORISED will place them in the ![]() status.
status.
Please note: Posting your invoices with an AUTHORISED status means that the invoices will not need to be reviewed in Xero before payment is made.
Edit Supplier Links
Edit Supplier Links enables you to establish connections between Suppliers in CTB AND CO and Xero. Simply click the Edit Supplier Links button:

Next, use the dropdown box to select the matching Supplier from Xero:

Pay Term
Please note: If you do not configure your Pay Term in the following steps, the default due date for your invoices will be the same date as the invoice date.
Establishing a Pay Term enables you to send Invoices to Xero with a predefined Due Date for each Supplier, determined by a specific time frame.

To set this up, begin by heading over to your Admin Settings, and select the Company Information tab. Make sure that Xero is selected as your Accounting platform:

Next, navigate to your Admin Address Book and select the Supplier you wish to set a Pay Term for. Now you will be able to enter the number of days and the specific time frame from the drop down box:

- 5 Day(s) after invoice date (adds 5 days) = 27th August
- 5 Day(s) after invoice month (end of the invoice month plus 5 days) = 5th September
- 5 Of next available month (5th of the next available month) = 5th September
- 5 Of the following month (5th of the next month) = 5th September
Another example, if the invoice date is 1st January 2025, the Due Date will be calculated as:
- 30 Day(s) after invoice date (adds 30 days) = 31st January
- 30 Day(s) after invoice month (end of the invoice month plus 30 days) = 2nd March
- 30 Of next available month (30th of the next available month) = 30th January
- 30 Of the following month (30th of the next month) = 28th February
Transferring an Invoice
1. Select Invoices to Transfer
Begin by using the checkboxes provided to select the invoices you intend to transfer:

Click image to enlarge2. Connect to Xero
Click the Transfer Invoice button and follow the prompts to connect to Xero (if you haven't already) and allow access to the platform. If you have already connected, simply click Continue when prompted:

3. Select an Account
To begin exporting, select the appropriate Account under the respective Class from the list provided. Once you have selected the required Account, click Continue:
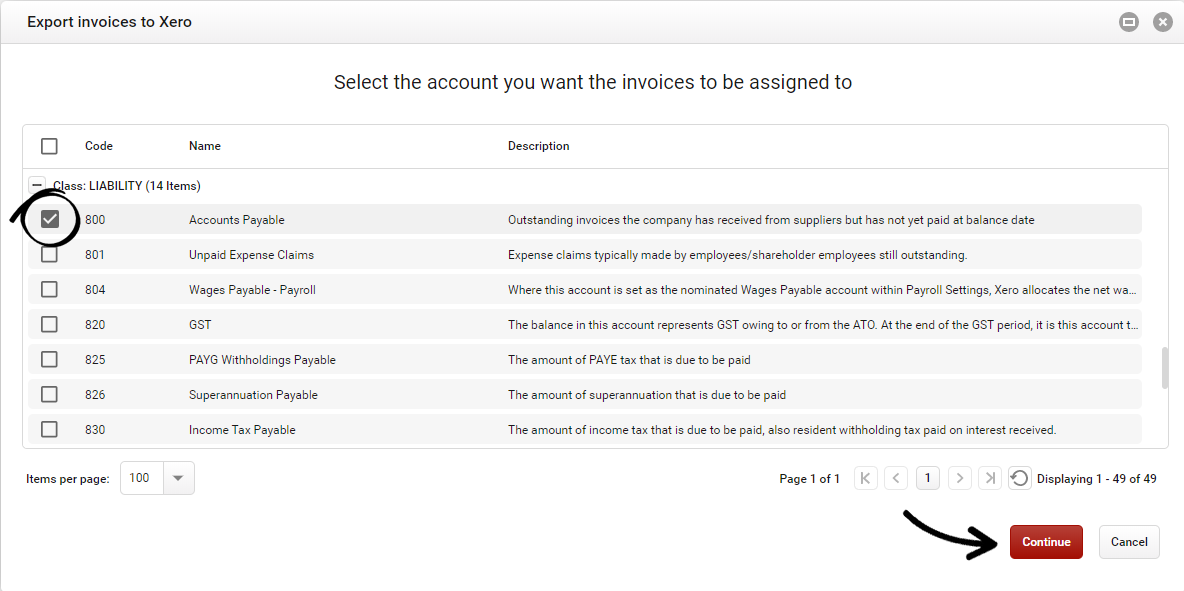
Click image to enlarge
Please Note: Suppliers that have a Default Account Code will be automatically assigned to their nominated Account. If you selected invoices from a range of Suppliers, the Account you select at this stage will only apply to Suppliers with no specified Default Account Code. If all selected Suppliers have a Default Account Code, this step will be skipped.
All corresponding line items from the selected invoices will be recorded under the nominated Account unless the line items have GL Codes directly assigned.
4. Select corresponding Xero Supplier
Match the Supplier for each invoice will a corresponding Xero Supplier on the right by using the drop-down provided:
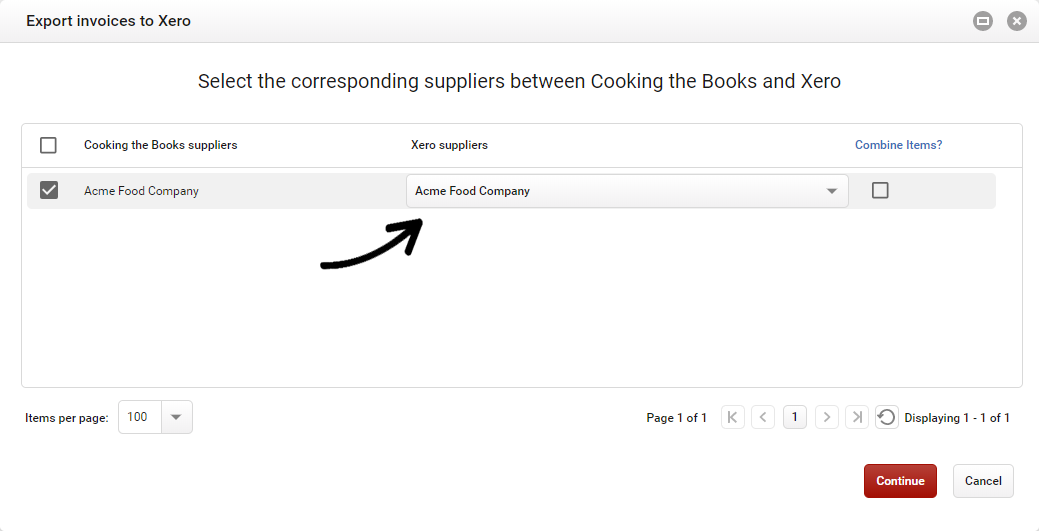
Click image to enlarge
Please Note: If you wish for all line items from each selected invoice to be combined into a single Food/Beverage/Default related item, tick the checkbox under the Combine Items column.
5. Manage Non-Food/Beverage/Default Items
If any of the selected invoices contains any Non-Food/Beverage/Default items (description is dependent on the platform used) that do not yet have a pre-configured GL Code, you will be prompted to select a Xero Account for those items:
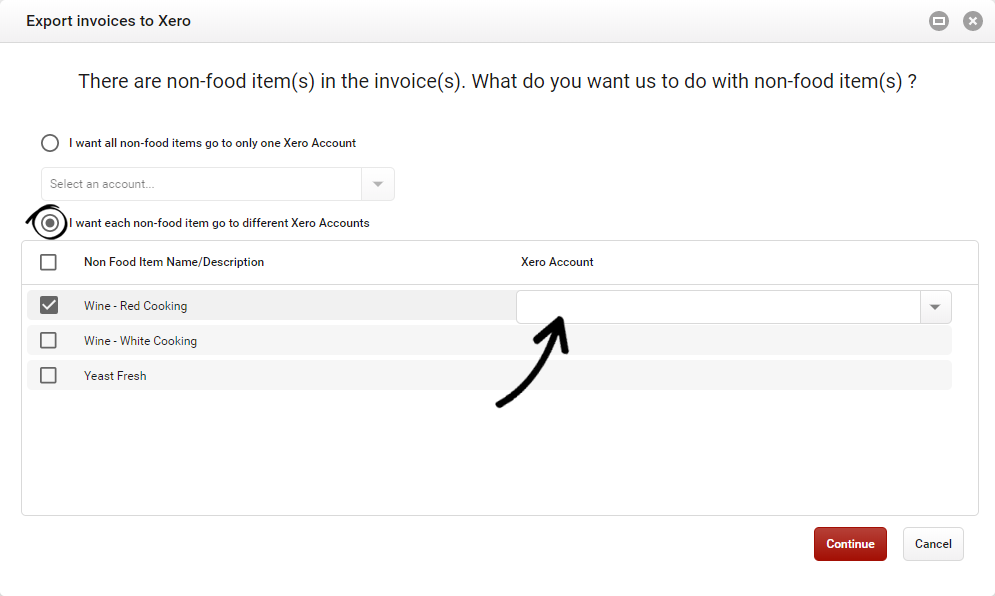
Click image to enlargeSelect your desired option for these items, noting that you can combine them all into a single Account, or individually specify an Account for each applicable item.
6. Export to Xero
Once your Suppliers have been matched and any Non-Food/Beverage/Default items have been managed, click Continue to begin exporting. Take note of the progress of each individual invoice. Once the exporting process has concluded, click Finish to close the export window:
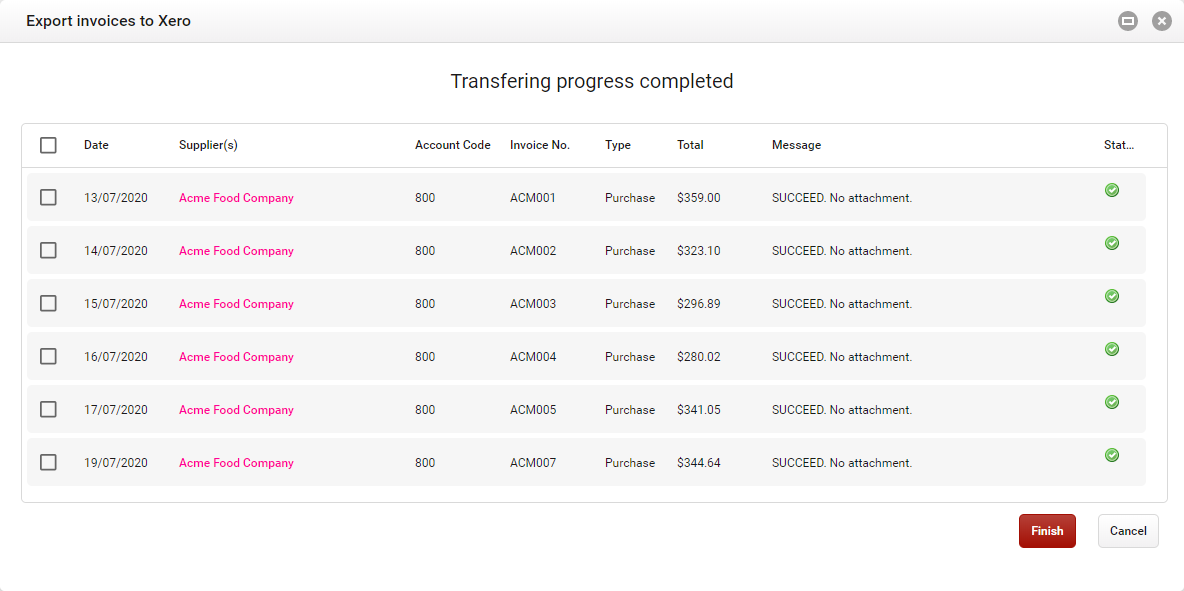
Click image to enlargeYour transferred invoices will then appear within Xero as a draft bill (or your Outlets configured default Invoice Status if you have one). Any PDF attachments will also be displayed in Xero for each corresponding invoice.
Disconnecting from Xero
To remove your connection to Xero, click the Disconnect from Xero button:
 This will allow you to safely close the window or otherwise re-connect to a different Xero organisation if required. A notification will be displayed confirming the connection has been removed.
Tip: If you forget to Disconnect from Xero and then move to another Outlet, the system will ask you to re-connect to Xero at the new Outlet.
Fixing Xero Connection Errors
If you encounter an error when connecting to Xero, it is usually due to a specific security limit enforced by Xero regarding "Uncertified Apps."
What is an Uncertified App?
Xero categorises integrations into two groups:
-
Certified Apps: Apps available on the official Xero App Store. These have no connection limits.
-
Uncertified Apps: Custom or private integrations that are not currently listed on the public Xero App Store.
The Restriction: Xero allows a maximum of two (2) uncertified apps to be connected to a single Xero organisation at any one time. If you already have two other private integrations connected, Xero will block CTB from joining.
You will typically see a message stating:
“Uncertified app connection limit reached. You can only connect two uncertified apps to an organisation.”
How to Resolve the Connection
Step 1: Refresh your Session
Before changing your Xero settings, try a simple refresh to ensure it isn't a temporary session error.
-
Log out of Cooking the Books.
-
Log back in and attempt the Xero connection again.
Step 2: Disconnect an Existing App in Xero
If the error persists, you must "make a slot" for CTB by disconnecting an existing uncertified app within your Xero account.
-
Log in to your Xero account.
-
Go to your Connected Apps settings.
-
Identify an "Uncertified" app.
-
Select Disconnect.
-
Return to Cooking the Books and reconnect to Xero.
Still having trouble?
If you continue to see an error after these steps, contact our support team and include:
-
The exact error message
-
A screenshot (if possible)
We’ll help you resolve it quickly.
Want to find out more? Should you require further assistance, please Contact Us or start a live chat today!