Last Updated: October 1, 2024


Why record my Stocktake?
Imagine being able to conveniently place orders based on your estimated stock levels, or getting an accurate, up-to-date valuation of your stock on hand. Better yet; imagine making your routine Stocktake easier to complete by knowing what stock was ordered since you last took inventory!
These are just some of the benefits that come from digitizing your Stocktake, and this article will help make sure it's as convenient and easy as possible!
Creating a new Stocktake
Before getting started, be sure to check out our Creating Stocktake Templates article to see how you can leverage from Templates to organise your stock list and complement your workflow. This isn't a necessary step, but it's highly recommended!
To create a new Stocktake, navigate to the Stock heading and select Stocktake:
 Go ahead and click New. You'll then be able to specify the Date of your Stocktake, apply a custom Template, and select whether you want to use a prior Stocktake to filter your list of stock items:

When ready, click Create to continue. The Stocktake Detail window will then be displayed:
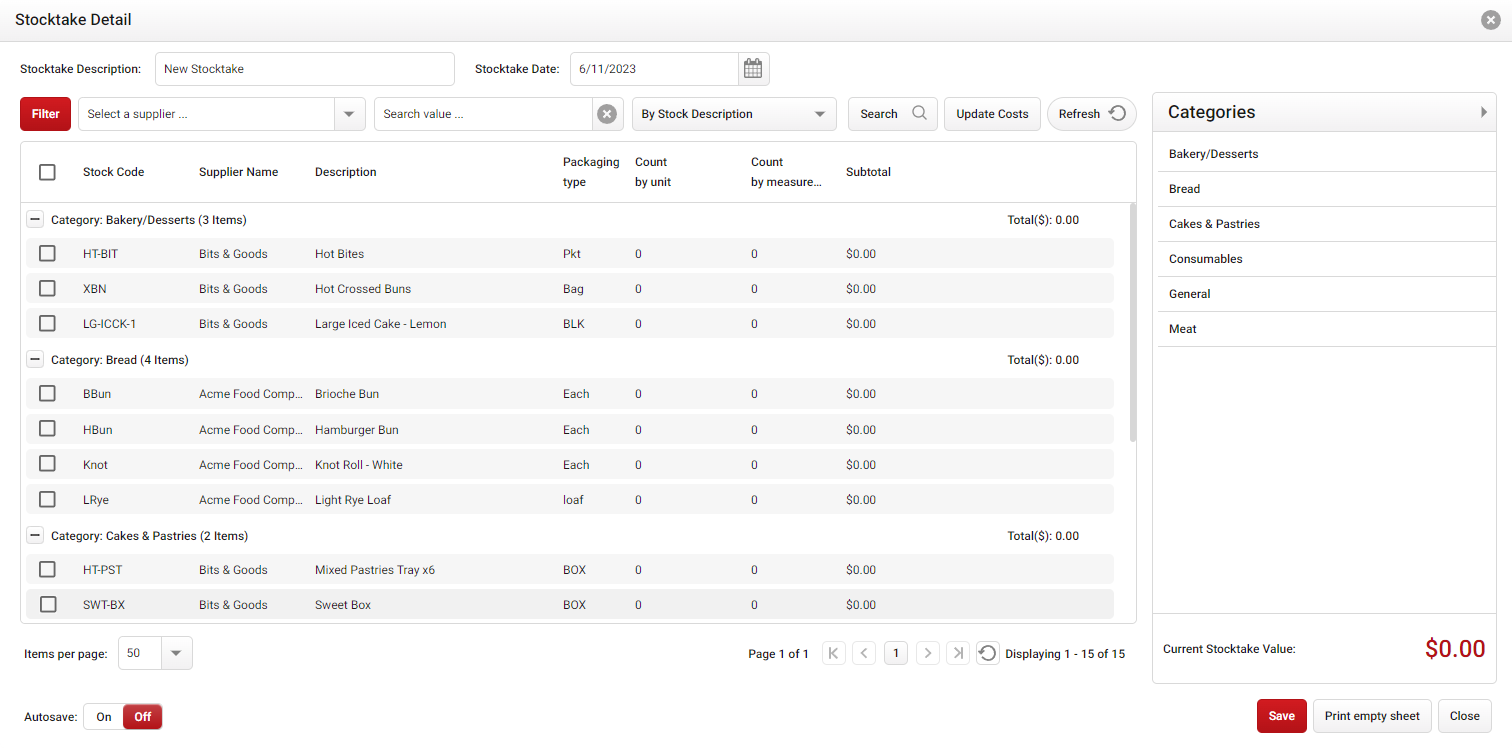
Click image to enlargeWow, there's a lot going on here! But don't worry, things will make sense pretty quickly. First, let's discuss how you can count your stock.
Please Note: By default, users may enter counts by the Unit or Measurement of each stock item, however you may also specify multiple Packaging Types for your stock and count by these refined values instead. To switch counting methods, see our Setting Custom Unit Conversions guide for further details and refer to the relevant section below.
Method 1: Counting by Unit & Measurement
Under this method, two primary options of counting stock are available:
- Count by Unit: For recording the total number of a particular item, and;
- Count by Measurement: For counting based on the item's measurement type.
Entering a value in one method automatically calculates the other, so there's no need for tricky math. As an example, if you have 12 bottles of wine that are 750ml in size, you can record this as either:
- 12 Units, or;
- 9000ml.
Both are correct, so just go with whichever is more convenient for you to determine.
Click the relative column next to the stock item you wish to tally to enter a value. You'll start to see your running Subtotal for each Category appear in both the top-right and bottom-right of the window as you begin counting your stock:

Method 2: Counting by Unit Conversions
If you've set up specific Unit Conversions for your stock and switched to this method, your Stocktake window will look a little different. Next to each stock item will be a list of the relevant Packaging Types it's associated with, allowing you to count by the different forms the item comes in.
Four Count by Unit columns will be shown to the right of each stock item, with the respective Packaging Type noted in brackets. Simply select the record you wish to count and enter a value:

When needed, you may also opt to Count by Measurement using the field provided. This count is based on the Measurement associated with the stock item, such as kilograms or litres.
Continue this process for each Packaging Type and stock item you need to tally and take note of the running Subtotal for the given item and its Category.
For added convenience, enable the Autosave feature by clicking the switch down the bottom-left of the window, which will intermittently save your progress:
 When you're done, be sure to click Save to finish. You'll see your new Stocktake and its current total, but you can always come back and click Edit to continue if you need.
Searching and filtering stock
We get it; sometimes you can't avoid having lots of stock. All the more reason to know how to search for and filter your stock to find exactly what you need!
There are plenty of ways to organise the stock available at your disposal; from searching by Supplier to filtering by a previous Stocktake. Be sure to familiarise yourself with the below methods to get the best results.
Please Note: When you exit a Stocktake, any applied filters will be removed. Be sure to add your preferred filters again when reviewing your Stocktake.
Searching for stock
You'll probably already be familiar with the typical searching methods available; simply select a Supplier or choose a search method and enter a term. Each of these options are available at the top of the Stocktake Detail window, just go ahead and select whichever way suits best:
 To clear your search, click the Refresh button on the right to return to your full list of stock items.
Filtering stock
To refine your list of stock items, click the Filter button to see the range of options available:

The Filter Stocktake window will then be displayed, which gives you access to filtering by a previous Stocktake or items that were invoiced within a set period. You can also change the sort direction of your results:

Simply make your desired selections and click Select to apply your filter.
You can also quickly and conveniently filter your stock by Category using the list on the right side of the window:
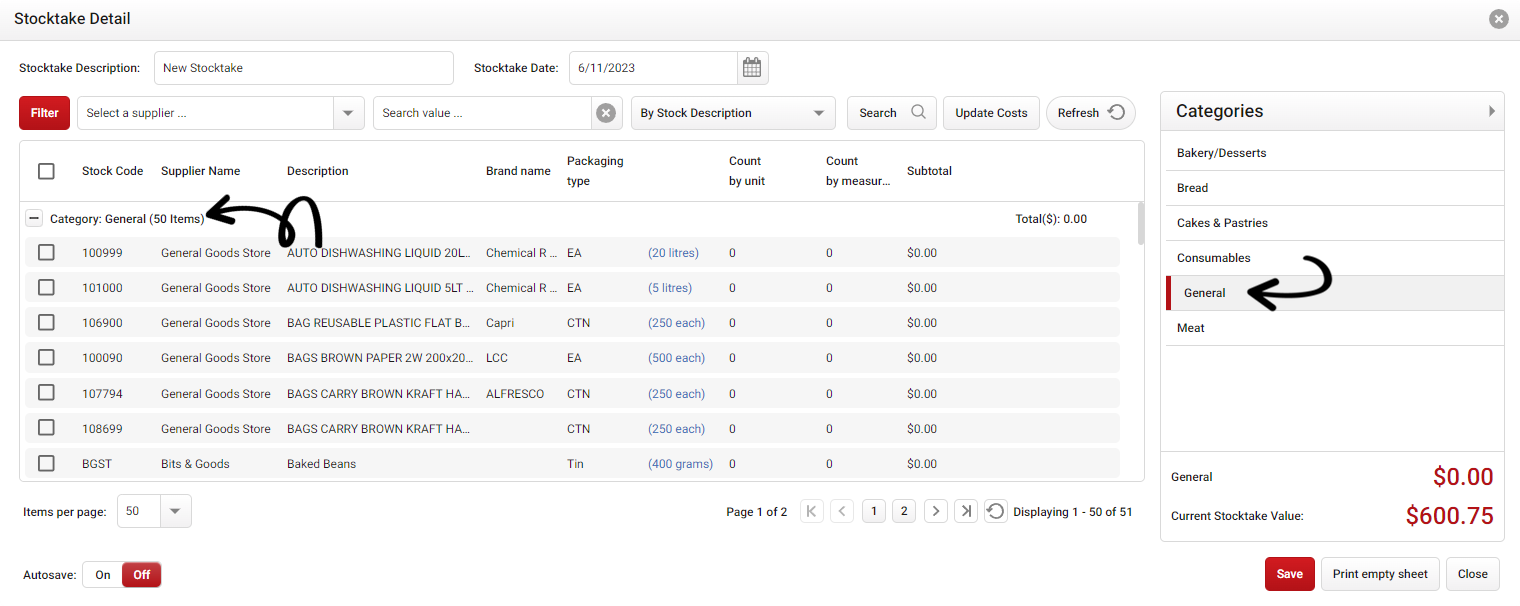
Click image to enlargeYou'll even get a running total of the selected Category just above your Current Stocktake Value down the bottom-right of the window for a quick breakdown.
Adding more Templates
When you first create a Stocktake, you're able to select any Templates you wish to apply. However, what if you have more Templates you wish to add later on?
This can be easily done by following the same steps as when you initially made the Stocktake; just be sure to select the same Stocktake Date before clicking Add:

Remember that you can select multiple Templates at the same time, so feel free to add as many as you need, whenever you want!