Advanced Budget
Configuring your Advanced Budget to enable the dashboard Budget Overview tile and Advanced Budget information
Last Updated: October 1, 2024



About the Advanced Budget feature
The Advanced Budget Feature automatically calculates your daily budgets using your recent purchases, Food / Beverage Cost Limit, and your daily Revenue Budgets. The daily budget is then shown in detail in a Budget Overview dashboard tile on your home page, and also summarised in the Budget Menu located at the top of the screen.
The Budget Overview and Budget Menu can then be used to make agile purchasing decisions based on your actual revenue and expenditure.

Regardless of how you choose to configure your Advanced Budget feature, there are a few general tips to stay on track.
As a rule of thumb, aim for green! Green means you're on track and red means you might need to adjust your purchases to ensure you meet your budgets.
The Budgeted Food Spend is automatically calculated by multiplying your Budgeted Revenue by the Ideal Food / Beverage Cost Limit %. If you haven't set a limit then it will use 30% by default.

Keep your Food spend remaining and Budget Remaining fields above zero! They tell you exactly how much you should spend for the remainder of your week or month:

Keep your Current Food Cost and Food Spend (%) below your Ideal Food / Beverage Cost Limit to stay in the green:

View previous periods by changing the Time Period:

Quickly navigate to your Sales page by clicking the More Details button:

Before you begin
Step 1
IMPORTANT: If you have approved an Invoice using the No Match Order button, despite there being a matching Purchase Order, then the order amount will be deducted from your budget twice. To fix this issue, you can delete the unlinked Purchase Order.
Ensure that you have internal procedures in place for using the No Match Order button during the invoice approval process on the Receiving Orders page. This button should only be used if there is no matching Purchase Order/s.
- See Receiving an Invoice and Credit Notes for more information about approving invoices.
- Restrict certain users from using the No Match Order button with the Cannot use No Match Invoice User Authority. See Modifying User Authorities for assistance with updating authorities.
Step 2
Access to the Revenue Budgets page and Budget dashboard tile will require the Budget User Authority. Please see Modifying User Authorities for further details.
Step 3
Enter your upcoming Revenue Budgets at each of your Outlets.
Tip: Revenue Budgets can only be entered and edited for future dates, so to ensure accuracy for your budgets, make sure to enter your Revenue Budgets for the entire upcoming year or quarter.
Consider setting a repeating reminder for when you need to update your Revenue Budgets for the next period.
Step 4 Optional
If you prefer to have more precision in your budgets you can adjust your Revenue Budgets weekly (or even daily!) based on anticipated events, closures, public holidays, or other trends.
Step 5 Optional
The Advanced Budget feature uses your Ideal Food / Beverage Cost Limit to calculate your Budgeted Food Spend. The default limit is 30%. If you would like to change the limit follow the steps in the Specifying your Food / Beverage Cost Limit help guide.
How to configure the Advanced Budget feature
Please note: Budgets are specific to each Outlet. Meaning, if you have a Corporate database structure with multiple venues, you will need to configure your budgets at each individual Outlet.
Navigate to the Admin heading and open the Settings page:

Scroll down to the Budget Settings section and tick the Enable Advanced Budget Features setting:

The other optional settings in this section all determine how your budgets will be calculated and how they will display on your Dashboard. These settings include:
- Use Progressive Budget
- Consider Requisition Out as a Negative Purchase for Budget
- Purchase Tax is included in budget calculations
- Budget Period: Weekly or Monthly
- Budget calculated from: Order Date or Delivery Date
Progressive Budgets
When the Progressive Budget feature is enabled, you will see two additional columns on the Budget Overview Dashboard tile: Revenue's Effect on Budget and Progressive Food Budget.
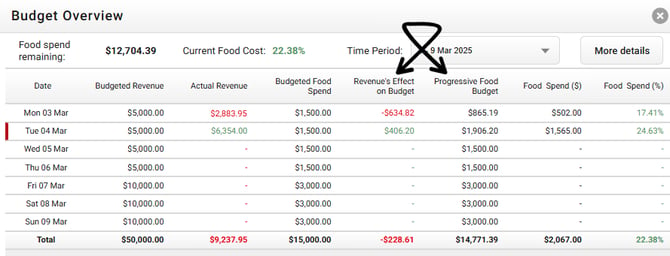
The Revenue's Effect on Budget field shows the difference between your Actual Revenue and Budgeted Revenue and then applies your Ideal Food / Beverage Cost Limit. This figure can be used to determine how you should adjust your spending in response to your Actual Revenue.
The Progressive Food Budget represents your updated Food Budget after factoring in the impact of the Revenue's Effect on Budget.
In the example shown below, we can see that our Actual Revenue on Monday came in short of our Budgeted Revenue. After the Food / Beverage Cost Limit is factored in, we have $634.82 less to spend for Mondays budget.
We did a little better on Tuesday, resulting in an additional $406.20 available for Tuesdays budget.
To effectively manage our budget for the rest of the week, it's important to monitor the totals closely. This will allow us to promptly adjust our spending in response to any further shortages in anticipated revenue:

The Revenue's Effect on Budget total will also be displayed on the Budget menu in the Adjustment field making it easy to track from any page in the system:

Consider Requisition Out as a Negative Purchase for Budget
Enabling this setting ensures that when you transfer stock to other Outlets, the corresponding amount will be deducted from your Food Spend ($). Essentially, the expenses incurred for the food sent to another Outlet will not impact your Outlets budget.
In the example Budget Overview shown below, we sent $100 worth of food to another Outlet on Tuesday and made no purchases. This resulted in $100 being deducted from our Food Spend ($) and then added back to the Food spend remaining:
Purchase Tax is included in budget calculations
Enable this setting to ensure tax is factored into your Food Spend ($), Food Spend (%), and Food Spend Remaining. If you need to consider the cost of tax for your food budget then make sure to enable this setting.
Budget Period: Weekly or Monthly
This will determine the time period shown in your Budget Overview Dashboard tile and Budget Menu.
The weekly dashboard tile has a focus on the current weeks daily budgets and will summarise the prior 2 weeks in the bottom rows of the table:
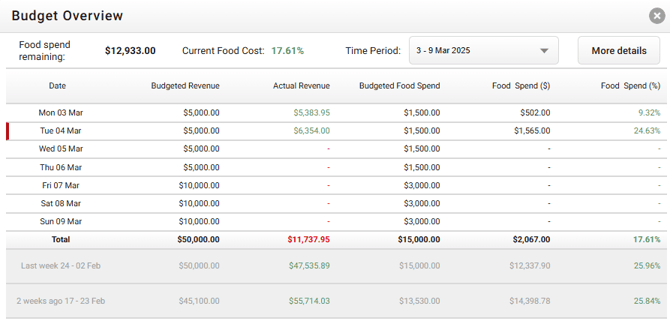
The weekly Budget Menu focuses on the budget and revenue figures for the current week.

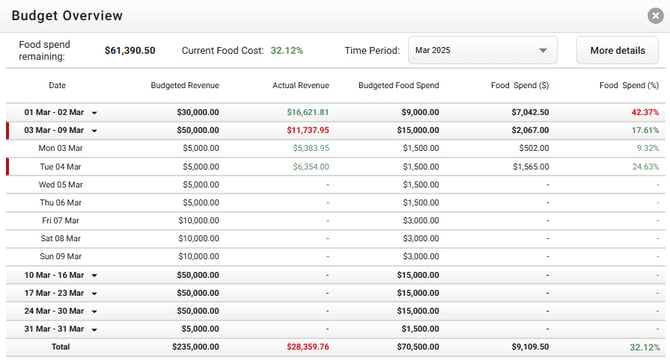
If you make purchases less frequently then it may be more beneficial to focus on the monthly budget and revenue instead. The monthly dashboard tile provides figures for the entire month and allows you to expand any of the weeks to view details for individual days:

Budget calculated from: Order Date or Delivery Date
The Budget calculated from setting determines which date expenses are deducted from your Food Spend budget.
IMPORTANT: When this setting is configured to use Order Date be aware:
- If you manually create invoices from receipts or paper invoices directly on the Invoices & Credit notes page, the total amounts will be deducted from your budget on the date you created the invoice (not the Invoice Date).
- Invoices approved using the No Match Order button, will have their totals deducted from your budget on the Created Invoice date.
Selecting Order Date will base your Food Spend on the date that Purchase Orders, Requisition Orders, or Credit Request were sent:


Selecting Delivery Date will base your Food Spend on the expected Delivery Date of Purchase Orders, Requisition Orders, or Credit Requests:
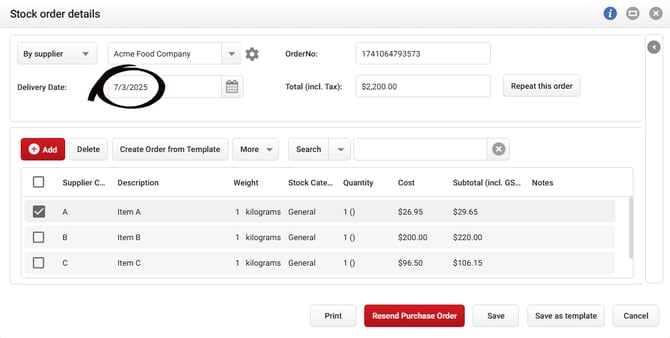

Once the order is approved on the Receiving Orders page, the date will be updated to the date of the approved Invoice or Credit Note:


Need help setting up? Should you require further assistance, please Contact Us or start a live chat today!
